Share
Tags

,

All About Surface Mounts (For Vinyl & Aluminum Posts)

Surface mounting is attaching a fence or screen to a solid surface. The surface could be a wood deck, concrete patio, sidewalk, or driveway.

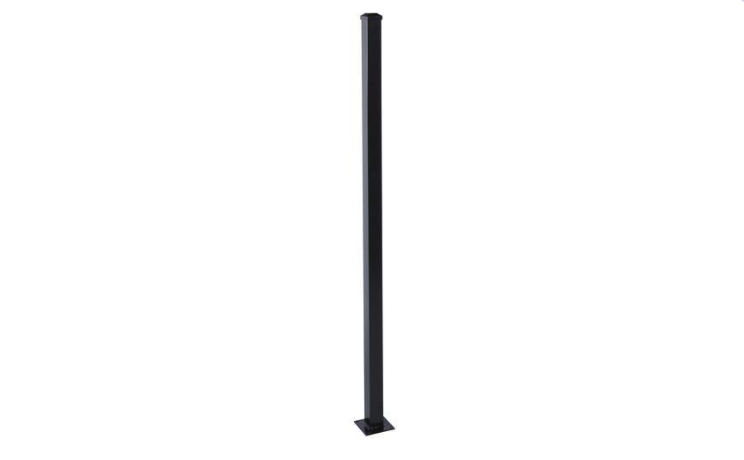
Any WamBam vinyl fence or aluminum fence can be mounted to a wood, or concrete surface using our vinyl surface mounts or aluminum surface mount post.
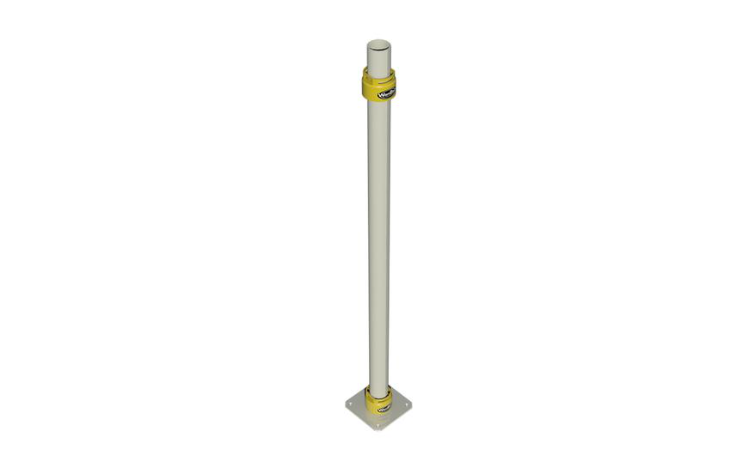
Please see below for installation instructions on various surfaces.  Installation of our vinyl surface mount onto concrete can be viewed here, but the concept is the same for aluminum surface mount posts or Zippity surface mounts for shower kits:

Surface Mounting to Concrete (shown in video above)

Before mounting on your concrete surface, make sure that the concrete is 4” thick or more. It is best to mount 2” or more away from the edge of the concrete to prevent cracking.

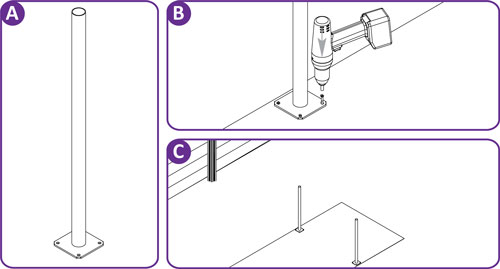
  1. Place the surface mount at the intended location and mark where the holes are.  
  2. Set aside the surface mount.
  3. Using a hammer drill,  make holes 2″ deep in concrete where they are marked from the surface mount. 
  4. Place surface mount back at the intended location.  
  5. The newly drilled holes should match up with the holes in the base of the surface mount.  
  6. Secure to concrete with wedge anchors.
This image has an empty alt attribute; its file name is MountPoststoSurfaceABC.jpg

Surface Mounting to Wood or Composite Decking

If you have access under your wood deck, please mount an additional 2×6 or 2×8 wood block underneath your deck surface. This is to alleviate stress from bolts attaching surface mount to the wood floor. If your deck surface is composite, please know this step of adding a wood block is even more critical as composite decking is not as hard as wood decking. Afterwards, continue with steps below.  

  1. Place the surface mount at the intended location and mark where the holes are.  
  2. Set aside the surface mount.
  3. Drill holes through both the deck surface and the additional wood blocking.
  4. The newly drilled holes should match up with the holes in the base of the surface mount.
  5. Using 3/8″ x 4” diameter bolts, washers, and nuts; secure from the underside of deck. Do not use wood screws or lag bolts.  

Mounting to Thin Concrete

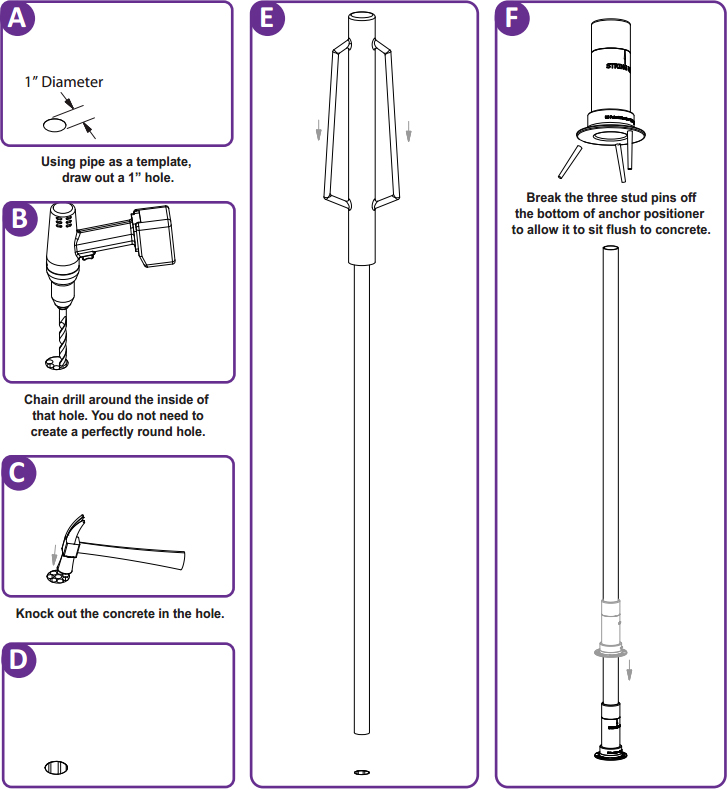
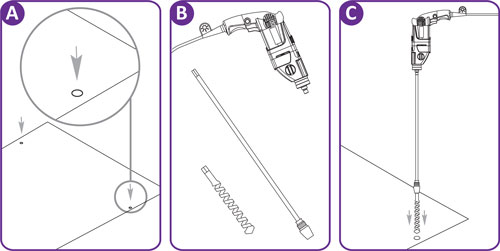
If concrete is less than 4in. thick, you may want to attempt drilling directly through it so you can insert one of our pipe anchors through it and into the ground, as illustrated below.

A. Mark holes for drilling.

B. Use a 1-5/8″ concrete drill bit (for vinyl pipe anchors) or 1″ concrete drill bill (for aluminum pipe anchors), extension if needed, and a concrete hammer drill.

C. Drill both pre-marked holes completely through concrete.

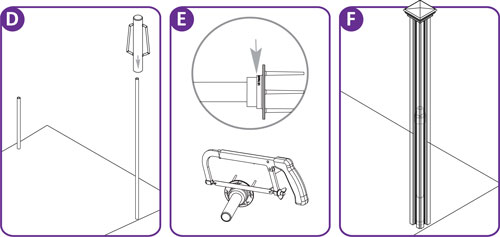
D. Pound pipe anchors through holes in concrete to recommended depth.

E. Trim prongs from anchor positioner along bottom edge.

F. Install post over pipe anchor. If necessary, see fence instructions for more information on how to install anchors, adjust leveling donuts and install posts. A vinyl post is pictured above.

Another (Least Preferable!) Option: Chain Drilling to Create a Hole in Concrete

If you only have a few holes to create, and don’t have a drill bit large enough to accommodate your pipe anchor diameter, you may want to consider using a drill to create a 1-5/8″ or 1″ hole.

Please note: Mounting on pavers or brick is not recommended

Generally, most pavers and brick are not cemented in. They sit on top of granular sand/gravel or sometimes over concrete.  Do not use our surface mounts in these cases. You can drill through your paver or brick (although it may crack!) and pound pipe anchor into the ground below it. Another option is to remove paver, install post in ground, then cover ground around installed post to your liking.

What about asphalt?

You cannot use surface mounts on asphalt.  It is not hard enough.  You can drill through the asphalt or use a blow torch to soften it and then drive the pipe anchor through the hot, soft asphalt into the ground beneath. Install post over pipe anchor as per instructions.
Share
Tags

Customizing Panels 

One of the benefits to purchasing our vinyl fencing is that it can be cut down to fit your needs. If your run can’t be divided into an exact number of panels, you can cut one down to any width necessary. With varying yard sizes and layouts, this is a common occurrence that has allowed us to learn several tips and tricks for customizing vinyl panels.   

 Please keep in mind the following before making cuts:

  • Measure twice, cut once! Cutting rails too short for your space will require you to purchase replacements from our parts department.
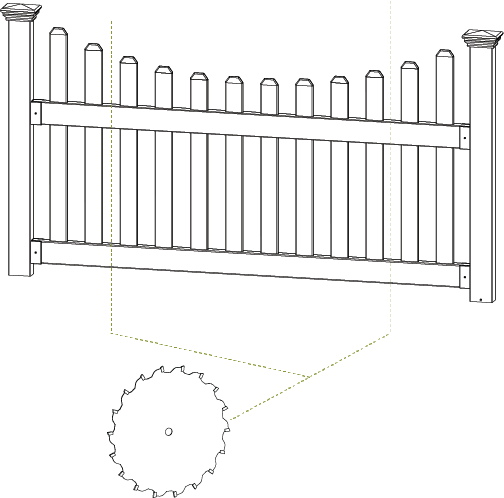
  • Use a fine-tooth blade when making cuts. We recommend using a circular saw. You can also use a handheld hack saw for minor modifications.  Most cuts are covered by rails or brackets, so don’t sweat the small stuff!

Permanent Fence (All American & Newport)  

Additional materials may be needed. These can be purchased from our website:  

  1. All American Finishing Posts or Newport Finishing Posts
  2. Rail Brackets

  After all required materials have been purchased, start with Step 1.

  1. Determine placement of posts.
  2. Measure distance between posts.  
    • Mark measurement on rail.
    • Aim to trim between picket slots. If marking falls within a picket slot, reduce distance between posts until the cut occurs between picket slots.  
    • Each end of the rail may need to be cut to avoid cutting through a picket route. This may not be possible to avoid.
  3. Medium grit sandpaper can be used on end of the rails to remove sharp edges or leftover pieces of vinyl after cutting.  
  4. Refer to instructions regarding mounting brackets and rails.  

Semi-Permanent Fence

Most of our Zippity semi-permanent fences were not designed for easy modification. Certain styles such as the Baskenridge fence (and other Zippity fences) have posts at the end of rails, making trimming panels to a more narrow width very difficult. Strongly consider the amount of modification you will need before purchasing or making modifications. If you must…

  1. Determine length needed for rail  
    • If the rail has an end cap, try to remove it for re-use, or order extra from our Parts department.
  2. Mark measurement on rail. 
    • Aim to trim between picket slots. If marking falls within a picket slot, reduce distance between posts until the cut occurs between picket slots.  
  3. Repeat Steps 1 and 2  
  4. Use a fine-tooth blade circular saw to cut through the rail.
    • Medium grit sandpaper can be used on end of the rails to remove sharp edges or leftover pieces of vinyl after cutting.  
  5. If trimming off routed post holes (such as with the Baskenridge), new holes will need to be created using a Dremel routing tool. Use the Dremel routing tool to expand picket slot to fit post through. 
  6. Install End Cap on rail. Use a small amount of vinyl glue, which can be found at most local hardware stores, if needed.  
  7. Continue with assembly per the installation guide.
Share
Tags

How to Attach a Manchester Panel to a Manchester Gate

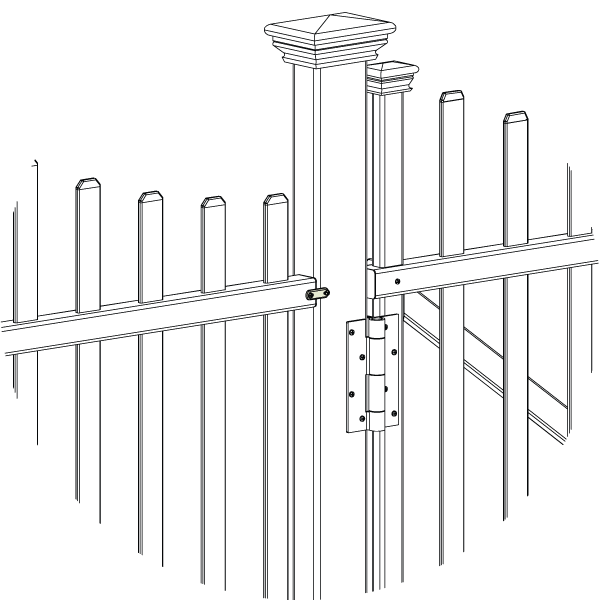
The Manchester gate uses posts that are a different width than the rails on the Manchester panel. These thicker posts are better for supporting the weight of the gate. Because of this difference in design, the rails from the fence panel don’t line up perfectly with the posts from the gate. Use this guide to see how to go about connecting the two.

When attaching a Manchester panel to the gate there are a few key tips to keep in mind.

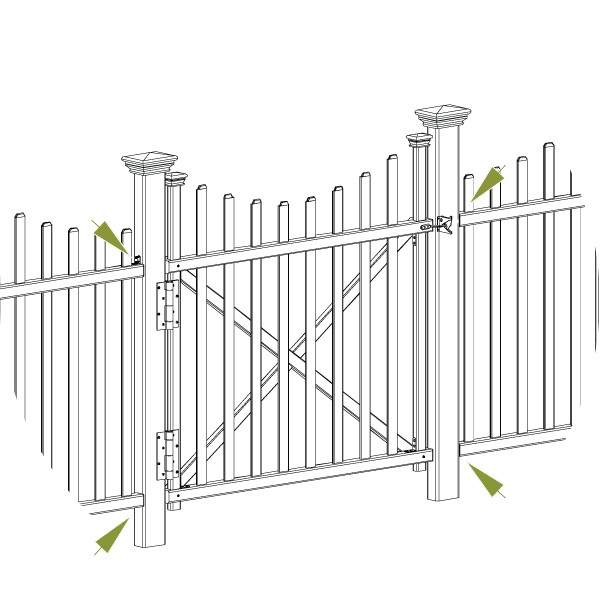
  1. Position and install the gate posts before doing anything else. The gate will perform better and last longer if the hinge post is connected to a panel of fence that is connected to another post. This way, the weight strain will be transferred onto two posts versus just one.
  2. Installing fence panels on both sides of the gate is ideal in all situations. If this is not possible because of space restrictions, you should make sure your “lone soldier” post is reinforced either by concrete or bracketed to the adjacent structure.

There are two different options of hardware to use to connect a Manchester panel to a gate:

Joiner clips  

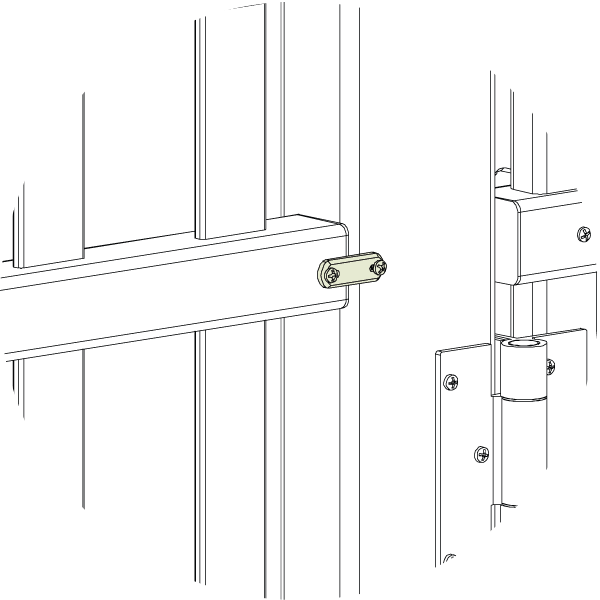
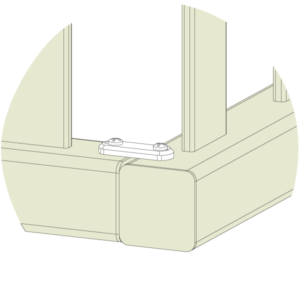
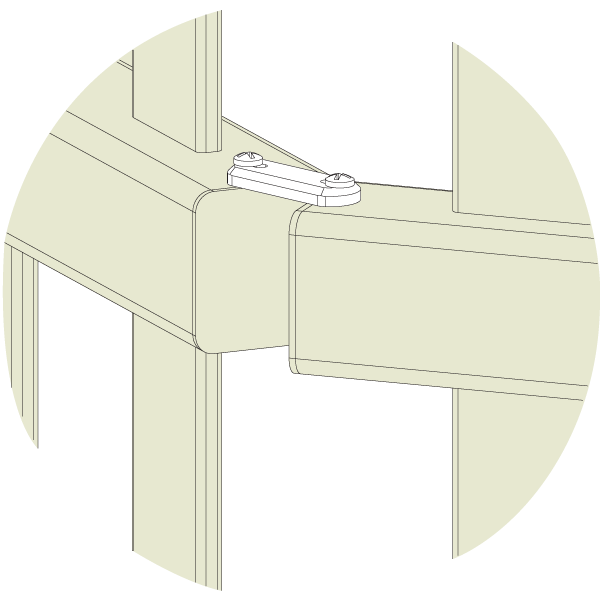
Use the joiner clips (included with Manchester fence) to attach the gate to the panel posts.  

  1. Align fence panel to “front” or “back” of gate post so the rail is flush with post.
  2. Using joiner clips, attach post to top rail and bottom rail.

L-Brackets   

Using L-brackets is an option that could be more costly, but it does provide a stronger connection than using joiner clips.   

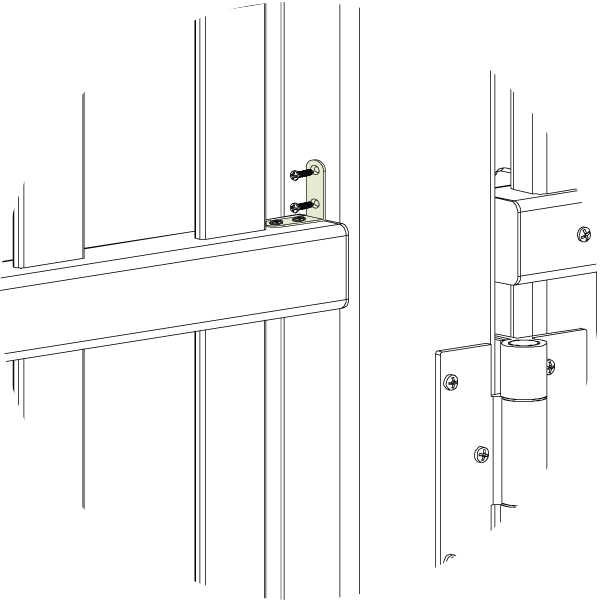
  1. Purchase white L-brackets from a local hardware store or from our parts department. Make sure the width of the L-brackets you purchase do not exceed the 1.5″ width of the panel rails.
  2. Align rails with the center of the post at your desired height.   
  3. Attach L-brackets to rails and posts as indicated below:
Share
Tags

Installing Privacy Screens in Various Layouts

Most of our privacy screens are designed to be a simple L-shape to block the sightline to a trash can or air conditioner. But many of our customers end up customizing the layout of their screen to accommodate multiple cans or to hide an unsightly gas tank.

Below, we will detail the most common layouts and how to go about achieving these alternate builds. It is important to note, you may need to purchase additional parts or an additional kit. We also recommend visiting our Knowledge Article on ground reinforcement when building some of these options. 

Installation methods that do not follow the recommended installation will not be covered by the warranty, however you may still purchase any additional parts you may need through our parts department. All custom part orders are non-refundable. 

Straight Line Assembly

Instead of building the screen in an L or U-shape, a straight-line assembly is preferred. We strongly recommend viewing our ground reinforcement article when opting for this build.

Straight Line Assembly

For Screens Attached with Joiner Clips 

  1. Place panels end cap to end cap in a straight line. 
  2. Use joiner clips to attach the rails.  
  3. If extra joiner clips are needed, contact our parts department to purchase.  
  4. We recommend attaching at least one side of the screen to a solid structure, such as a house or shed, with the use of brackets. Reinforcing the ground stakes to obtain the highest level of stability is also an option if attaching the panel to a pre-existing structure is not possible. 

For Screens Using Posts with Channels

  1. Arrange the posts in straight line.
  2. Slide panels in grooves of posts and follow the installation guide for assembly here. Note that pre-drilled holes in the middle post are not created for a straight-line installation. Use a 1/8″ drill bit to create new holes in the post as necessary.  
  3. We recommend attaching at least one side of the screen to a solid structure, such as a house or shed, with the use of brackets. Reinforcing the ground stakes to obtain the highest level of stability is also an option if attaching the panel to a pre-existing structure is not possible. 

U-Shape Assembly

This build will be fairly simple. It is important to note that individual panels are not available for purchase, so another kit will need to be purchased. This means that an extra panel will be left when the installation is complete. We recommend storing this panel in case the screen gets damaged or replacement parts are needed in the future.

For Screens Attached with Joiner Clips 

  1. Follow instructions as normal to build the initial L-shape. 
  2. Open the second kit and select all parts needed to build the third panel. 
  3. Build this panel the same as the first two, following the installation guide. 
  4. Use joiner clips as before to attach this panel to the L-shaped structure, creating a U-shape.  

For Screens Attached with Posts with Channels  

  1. Follow instructions as normal to build the initial L-shape.  
  2. Open the second kit and remove the screws, 4 board walls, 1 post, 1 cap, and the ground stakes. 
  3. Add the post to the desired side to create a third panel. 
  4. Slide the 4 board walls into the post channels. 
  5. Secure top and bottom boards with screws. 
  6. Attach the ground stakes per the installation guide. 
  7. Install into the ground using method from instructions.
  8. Add the post cap.
Share
Tags

Installing Zippity Fence Panels at an Angle Other Than 90 Degrees

Sometimes projects require the fence panels to be angled in varying degrees outside of 90°. This article will detail how the rails can be adjusted to accommodate for an alternate angle.

Our semi-permanent Zippity fences use joiner clips to attach the panels together. The length of a joiner clip will allow you to place the panels flush against each other or place them at an angle.

HOW TO:

  1. Put the rails level, side by side, at the desired angle. 
  2. Place the joiner clip with one end on each rail. 
  3. Attach the joiner clip to the rail with screws. 
  4. This application should allow any angle. 

You can also use hinges as shown above for our semi-permanent fences. The hinges would need to be attached directly to the rail. Hinges and paint need to be purchased separately at your local hardware store and should be no larger than 1” wide.

Share
Tags

,

How To Draw A Good Sketch For Your Friendly Project Consultant

Determining how much material you need for your fence project can be a bit confusing at times.  That’s why WamBam has a friendly team of dedicated Project Consultants to help.

We only want you purchasing what you need to successfully complete your project.  No more.  No less.  Too much material will likely result in costly returns for you, and not enough material will likely result in needing to purchase more material with expensive shipping costs (not to mention longer install time until project completion).

Picture1

The easiest way for us to quickly and accurately quote your project is for you to provide us with a sketch.  We see all kinds of sketches from customers!  Some are good and some are … well, let’s just say, not as good.  (You should see our collection of “Best Worst Sketches” … some customers really crack us up!)

Most of the time, any sketch is better than no sketch.  Sketches help us understand what your project entails and how we can best quote you.  Sometimes customers need specialty items such as surface mounts, angle helper kits, swivel brackets, and more.  A sketch will help ensure we give you what you need for a successful install and also help us point out any helpful tips or areas of concern we see.

Ok, I get it!  You really want a sketch.  How can I supply a “good” sketch?

You don’t need to be a graphic artist or use architecture software to get us what we need.  A good sketch will contain the following information:

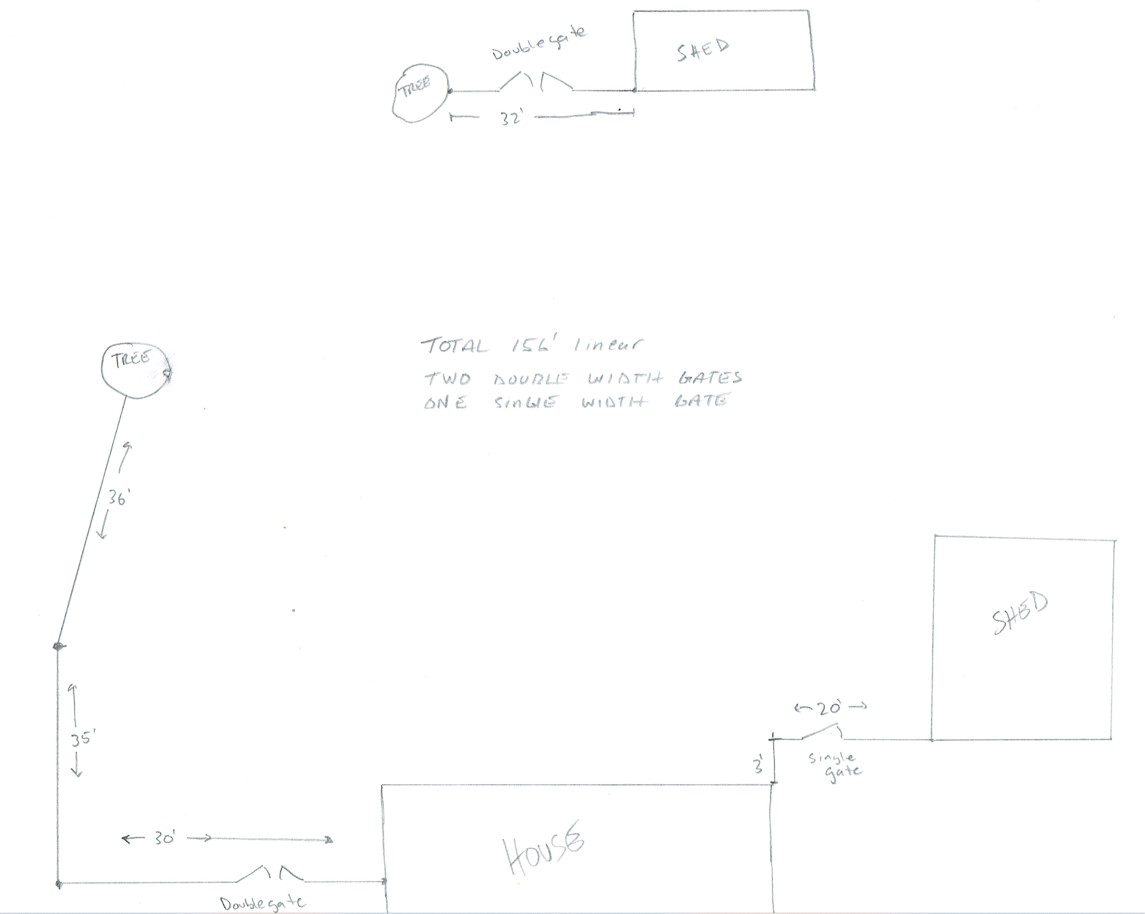
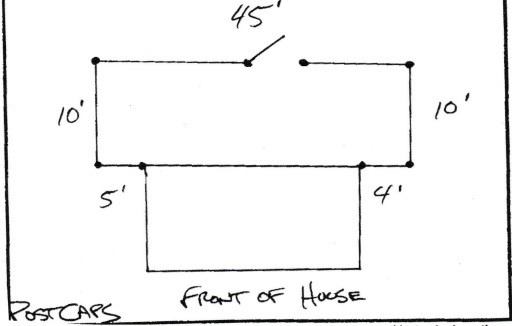
  • A basic drawing of your property and how you want your fence to be installed.  Pretend you are a bird flying over your house looking down.
  • Linear footage length of all your fence runs.  You’ll probably get a call or email from us if you don’t provide this!
  • Gate locations and widths.  Indicate double gates if necessary.  Gate quantity and locations can make a big difference in your material/price totals.
  • Any information such as drastic slope, posts mounting to concrete, different styles of fence desired (do you need both privacy and picket in your project?)

Some examples of “good” sketches:

Some examples of “less than helpful” sketches:

Wait, that survey map of my property is no good?

Survey or zoning maps are only helpful to us IF you draw how you want your fence to go with linear footage and gate locations.  But with all the other info on that sheet, most of which is of no use to us, it can get confusing and cluttered very quickly.   We prefer hand drawn sketches, honestly.  They’re easy for you and us.
How do I know what my linear footage is?

Well, you need to measure.  Use a tape measure or measuring wheel and walk your property where you want to install fence.  Indicate those run lengths on your sketch.  Remember, we need linear footage for each run of fence you want to install (not square footage for your entire backyard).

Our dedicated team of Project Consultants is here to help you through every step of the quoting and ordering process.  It’s all we do!  Request a free no-obligation quote HERE and let us help you get your fence project started!

Share
Tags

What drill and bits are best for my installation?

You’ll need a good drill (or two, more on that below) to install your WamBam fence.  Drills are needed to:

  • Predrill holes into galvanized steel pipe anchor for screws
  • Drive screws through pipe anchor positioner and leveling donuts into pipe anchor
  • Drive screws through vinyl to secure posts to pipe anchor and rails to posts
  • Drive screws through vinyl to secure gate hardware (hinges, latch, pin, etc) or rail hardware (aluminum only)

Good Drills To Use:

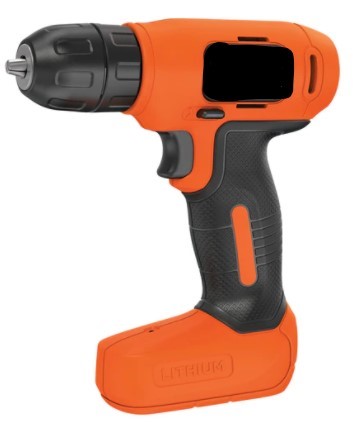
You preferably want to use a high-quality cordless drill with an adjustable torque setting.  The higher voltage, the better.  Drills that say “4 volt” or “8 volt” are not sufficient.  Use a 12 volt, 18 volt or even 20 volt drill.  It’s best to avoid using a cheap drill, as they might not provide the best performance to accomplish the job. In addition to the voltage rating, it’s preferable to have a drill with a “high torque” setting.  This will give you enough torque to pre-drill holes into your pipe anchor where necessary.  Here’s an example of both a good and “sub-standard” drill:

Drills To Avoid:

Again, you’ll want to avoid using a “weak” drill (low volts).  You also want to avoid utilizing a hammer drill, or any drill that oscillates the head of the drill in a forward or backward motion as you are engaging the trigger. Using this kind of drill can allow for trouble when installing screws, as the motion of the drill can cause stripping of screws, as well as a higher likelihood that you can damage your drill bit.  Here’s what a hammer drill typically looks like:


Why More Than One Drill?

If you have help with you for your install (did you bribe any family or friends with pizza and cold beverages?) you might want a few drills available so you are not having to constantly change out your bits during your install.

Speaking Of Bits…

There’s 3 types of bit you’ll need to install our fence:

  1. 1/8″ drill bit.  This is for pre-drilling holes into pipe anchor for tek screws, which is not required but you’ll likely find it helpful.  Use a bit suitable to drill into galvanized steel, such as one with a cobalt blend.  A bit designed for wood is likely not strong enough!  See more info HERE.
  2. 5/16″ Hex head drill bit
  3. Phillips head drill bit


Share
Tags

I have a sledgehammer. Do I really need a post pounder?

Customers sometimes ask, “I have a sledgehammer, do I really need a post pounder?”  The short answer is YES.  In our experience, having a post pounder makes your install easier and more consistent.  Here’s why:

  1. Post pounders give you a greater chance of installing your pipe anchor straight into the ground.  Straight pipe anchors are key to having straight posts and a good looking install.
  2. Post pounders reduce the likelihood of the top of your pipe anchor getting damaged (mushroomed).  This often happens when using a sledgehammer and can pose a problem when affixing leveling donuts to pipe anchor.
  3. Post pounders reduce the amount of physical work needed to install pipe anchors.  They are heavier than most sledgehammers and more weight behind force being applied typically means less number of strikes needed to drive pipe into ground.
  4. Post pounders require 2 hands, reducing stress on the installer’s arm/shoulder.
  5. Post pounders are (generally) safer than sledgehammers when driving pipes into the ground.  We’ve heard some cringe-worthy stories about swinging a sledgehammer after a long day of wamming and bamming!  See this post HERE for some safety tips about using a manual post pounder.

If you are only installing a few pipe anchors, a sledgehammer will get the job done.  But if you plan on doing more than 4 or so, we highly recommend using a pounder to help complete your project any of the reasons stated above.  The right tool makes any job easier!

Do you need to get a pounder from us?  Not at all.  You can absolutely source one locally, there is nothing proprietary about ours.

Here are the pounders we offer:

Picture1 Picture2 Picture3


Basic Betty: 18 lbs, recommended for one person with less than 12 posts: $50

Big Bertha: 27 lbs, recommended for 2 people who have more than 12 posts: $85

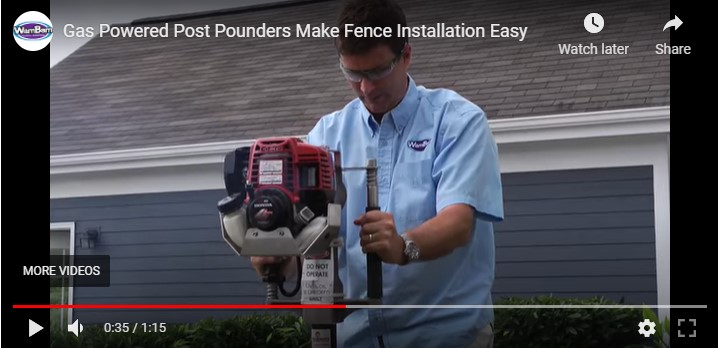
Gas Pounder (10-day rental): 58 lbs, recommended for 1-2 people and only available to customers who have more than 20 posts: $250

See how our gas pounders operate on this video HERE.

Screenshot 2021-12-28 104741

Adjusting Tension on Gate Hinges

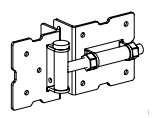
Our gate hinges are spring loaded to allow for self-closing gates.  Depending on what style of gate you are installing, there will be 1 of 2 different types of hinges utilized to attach gate and post.

Vinyl Gate Hinge              Aluminum Gate Hinge

Screenshot 2021-10-26 150359     Screenshot 2021-10-26 150427

Below please find the steps on how to adjust the tension on the hinge for each style.

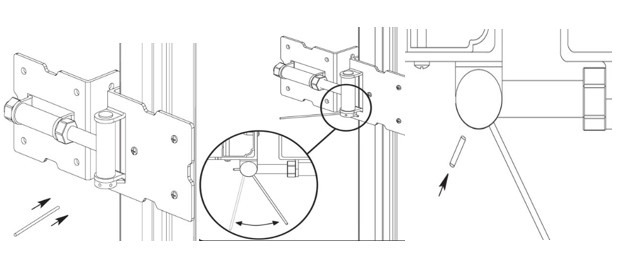
VINYL

  • Take the 2-3/4″ long gate tension pin that comes with your hinge and insert it into the wheel on the cylinder shaft of the hinge.
  • Rotate the 2-3/4″ long gate tension pin to allow for removal of small “stop” pin.
  • Remove the “stop” pin and place in forward hole to increase tension and reverse hole to decrease tension.

Screenshot 2021-10-26 150449

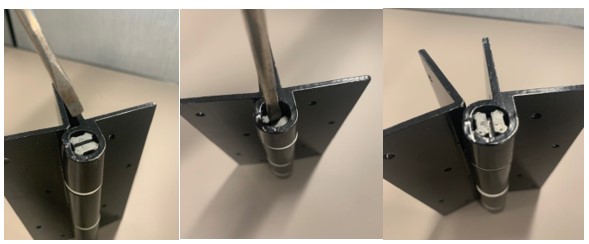
ALUMINUM

  • Take a flat head screwdriver and place on top center of hinge cylinder in the slot.
  • Push down and twist the slot to increase or decrease tension on the spring. You will want to keep constant downward pressure to be able to turn it.
  • Once it is set in position, release pressure and it will pop back up and lock into place.
  • Clockwise turn will increase tension and counterclockwise turn will decrease tension.
  • Repeat for underside of hinge.

Screenshot 2021-10-26 150601

Surface Mounting BL19042 Posts for Sturbridge or Nantucket Panels

We do not offer a dedicated surface mount for the posts that are used with our Nantucket and Sturbridge fence.  If you are looking to mount your Nantucket or Sturbridge posts to a concrete surface like a patio or wooden surface like a deck, in short, you have two options:   Surface mounting or core drilling.

SB61000 VINYL SURFACE MOUNTS:

To accomplish this, you will first need to take the leveling gears from the pipe anchor (that comes with the BL19042 post or post that accompanied your panel) and install them onto the vinyl surface mount (SB61000).

You will not need the leveling donuts that come with the surface mount.  You can discard these.

PXL_20211015_193900483

On the pipe anchor, the outer gear is removed by lifting up on tab.  Inner gear is attached to pipe anchor via tek screw.  This screw needs to be removed in order for inner gear to slide down off bottom of pipe anchor.

Attach inner gear to surface mount using tek screw.  You may need to pre-drill a 1/8″ diameter hole in surface mount for tek screw.  Install inner gear at lower position on surface mount first so you can put outer gear over it once installed.  Outer gear will not slide over inner gear if attached at top of the surface mount.

Screenshot 2021-10-15 115816BL donuts on mount full

Mount the vinyl surface mount as instructed in the installation guide.  An overview video can be seen HERE.

Keep in mind that our vinyl surface mounts are designed for our 4.5” x 4.5” posts, so the post for the Nantucket/Sturbridge will be slightly narrower at 4” x 4”.  You will notice the surface mount footing is slightly larger in size compared to the post.

Screenshot 2021-10-15 120725

Because of this, once the wedge anchors are installed on the surface mount footing, you could potentially have some issues toward the bottom of the post. To help combat this try to use a nut where the outer diameter is not larger than 9/16”.

With the surface mount, use 3/8” x 3” or 3/8” x 4” long wedge anchors. Depending on the brand of wedge anchor you use, fit of post end over wedge anchor nut is dependent on the diameter of the nut for wedge anchor being used. If you are using a larger nut with your wedge anchor, the post will sit on the nut leaving a gap. If your nut is smaller in diameter, then the post should fit over the nut.

space

CORE DRILLING:

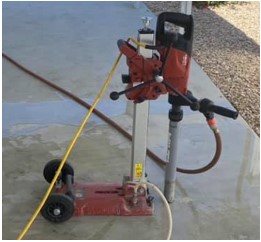
The other solution to attaching a post over a concrete surface is by core drilling. This involves using a core drill (a powerful drill designed to drill holes in solid rock or cement). Create a 1-7/8in. diameter hole through your concrete surface.  Pound pipe anchor through hole into ground beneath concrete to recommended depth.  If necessary, fill hole with liquid concrete or wedge the anchor directly into the hole if it is not tight enough.  Install post over pipe anchor as you would if it were in ground.

Most equipment rental stores will likely have a core drill available.  Here’s what one typically looks like:

Screenshot 2021-10-15 145232


Categories