All About Surface Mounts (For Vinyl & Aluminum Posts)
How to install WamBam surface mounts on concrete, wood decking, and more
Surface mounting means attaching a fence post to a solid surface instead of driving it into the ground. Common surfaces include concrete patios, wood decks, composite decking, driveways, and sidewalks. Any WamBam vinyl or aluminum fence can be surface mounted using our vinyl surface mounts or aluminum surface mount post.
Watch the video below to see how vinyl surface mount installation works on concrete. The same concept applies to aluminum surface mount posts and Zippity surface mounts for shower kits.
Installing on concrete
Important: Your concrete must be at least 4 inches thick. Mount at least 2 inches from the edge to prevent cracking.
Place the surface mount at the intended location and mark where the holes will go.
Set the surface mount aside.
Using a hammer drill, make holes 2 inches deep at each marked spot.
Place the surface mount back and confirm the holes line up.
Important: Do not use concrete screws or blue screws — wedge anchors only.
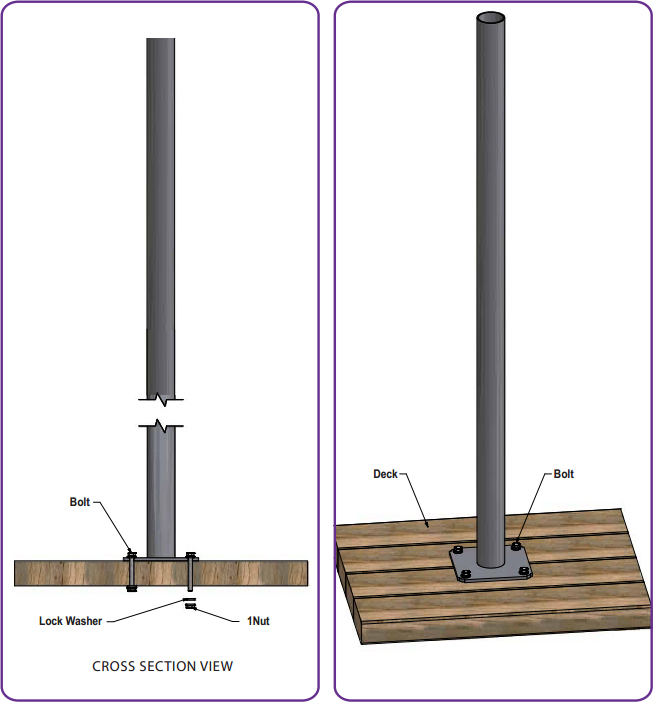
Installing on wood or composite decking
Tip: If you have access under your deck, attach an extra 2×6 or 2×8 wood block underneath the surface first. This reduces stress on the mounting bolts. This step is especially important with composite decking, which is softer than wood.
Place the surface mount at the intended location and mark where the holes will go.
Set the surface mount aside.
Drill holes through both the deck surface and the wood blocking underneath.
Place the surface mount back and confirm the holes line up.
Secure from the underside using 3/8 inch x 4 inch diameter bolts, washers, and nuts.
Important: Do not use wood screws or lag bolts.
Installing on thin concrete (less than 4 inches thick)
If your concrete is less than 4 inches thick, surface mounts may not hold securely. A better option is to drill straight through the concrete and drive a pipe anchor through it into the ground below.
Mark the hole locations.
Using a concrete hammer drill, drill a 1-5/8 inch hole (for vinyl pipe anchors) or a 1 inch hole (for aluminum pipe anchors) completely through the concrete at each marked spot. Use an extension bit if needed.
Pound pipe anchors through the holes to the recommended depth.
Trim the prongs from the anchor positioner along the bottom edge.
Install the post over the pipe anchor. Refer to your installation guide for details on adjusting leveling donuts and installing posts.
Chain drilling (last resort option)
If you only have a few holes to make and don’t have a large enough drill bit for your pipe anchor diameter, you can use a technique called chain drilling to create the required hole size. This involves drilling a series of overlapping smaller holes to achieve the larger diameter. This is a last-resort method and takes more time and effort than using the correct bit.
Pavers and brick
Important: Surface mounts are not recommended for pavers or brick. Most pavers and bricks are not cemented in place — they sit on sand, gravel, or sometimes over concrete, and won’t hold a surface mount securely.
Instead, drill through the paver or brick (note: it may crack) and drive a pipe anchor into the ground below. Alternatively, remove the paver entirely, install the post in the ground, and cover the area around the post however you prefer.
Asphalt
Surface mounts cannot be used on asphalt — it is not hard enough to hold them. You have two options:
Drill through the asphalt and drive a pipe anchor into the ground beneath it.
Use a blow torch to soften the asphalt, then drive the pipe anchor through the soft material into the ground. Install the post over the pipe anchor per your installation guide.
Tip: Still have questions about surface mounting? Call us at 877-778-5733 and we’ll walk you through it.