How do I equalize my fence sections to fit my overall fence run?

Very rarely will your fence sections all fit perfectly into your fence line. You have three options. You must consider these three options before installing your first anchor. Please  note that the illustrations below are of vinyl fence panels, but the same principles apply for ornamental aluminum fence panels.

BEST

Solution A: Trim all fence sections evenly

This way of equalizing your fence sections is most pleasing to the eye.  It is also the most work as you will need to trim every panel down in length. If you take pride in what you do, and have the time, this is the way most professional companies would tackle your project.

ACCEPTABLE

Solution B: Trim the end panels

Trimming down both end panels is an acceptable way to equalize your fence panels.This will minimize having one panel stand out like a sore thumb.

ACCEPTABLE

Solution C: Trim one end panel

This is not the ideal situation, but this method provides for the least amount of work and the least amount of waste. Professionals typically would not install your fence this way.


How do I compensate for anchors that have been pounded in severely crooked?

If your leveling donut will not allow for compensation of a severely crooked anchor, then you have at least three options.

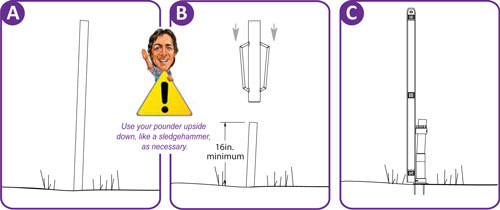
Option One: Drive the Anchor Deeper than Recommended

B. Continue to pound the anchor deeper into the ground than what we typically recommend. This corrective ability of your leveling donut is amplified the closer it gets to the anchor positioner.

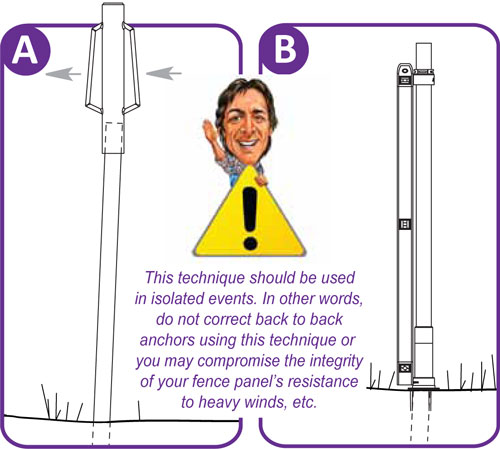
Option 2: Bend the Anchor

If the ground that your anchor has been driven into is tight, you may be able to bend the anchor as illustrated to compensate. Slip your pounder down over the anchor about 3-4in. Use the leverage in the pounder to bend your anchor into straight position. The integrity of your anchor will be slightly compromised, but still perform acceptably.

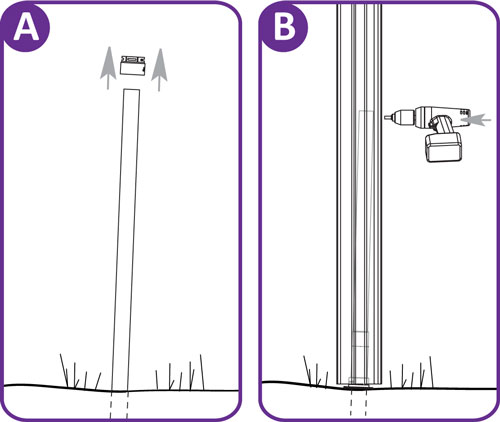
Option 3: Remove the Leveling Donut

A. Remove WamBam Donut.

B. Secure post into top of anchor.

Option 4: Straighten the Crooked Anchor

Moisten the soil around your anchor (A) and add soil on the offending side of the anchor (B).

Compact soil using the post pounder flipped upside down. A spud bar flipped upside down can also work really well.

Repeat as necessary until you have forced the bottom of the anchor into level.

Option 5: Remove the Crooked Anchor

Please see this article on “How to Remove a Crooked Anchor

How do I deal with loose or disturbed soil?

Your pipe anchors, even when driven to the recommended depths of 36 inches AND 48 inches, will have a wind load resistance problem if the ground around them is unstable. If your entire fence line is located in loose or extremely loamy conditions, you can install our fence system much like you would if you were installing a traditional fence with concrete footings. Unfortunately you did not purchase our fence to do that. You wanted to avoid drilling, digging, cementing etc. However, maybe in the course of installing your fence, you’ve run across a few occasional spots in your fence line that have shifty soil conditions. The following illustrations outline three options to overcome those isolated spots.

Option 1: Install Metal Post Stabilizers (purchase separately)

You can purchase our Metal Post Stabilizers here (click here for vinyl or click here for ornamental aluminum).
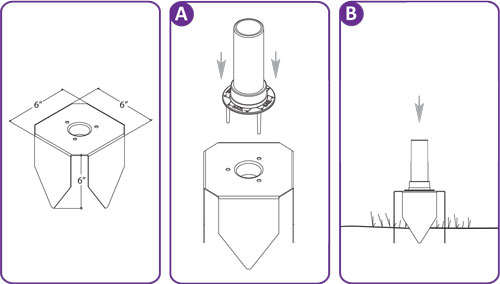
A. Insert the three legs on the Anchor Positioner into the three holes on the Metal Post Stabilizer.

B. Identify location and insert flush into the ground using hand force.
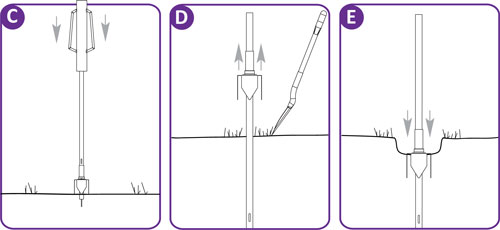
C. Once position is identified, insert your anchor and begin to pound into place.

D. Remove 1in. to 4in. of soil underneath the unit.

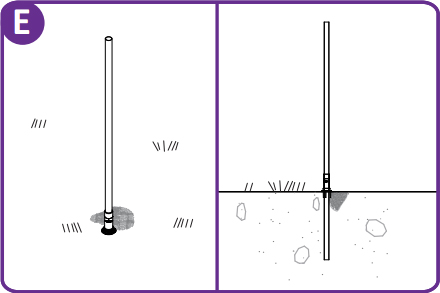
E. Ensure the entire unit is stomped tightly into the ground. Use hammer on exposed metal edges if required.

Option 2: Install a traditional concrete footing around your anchor
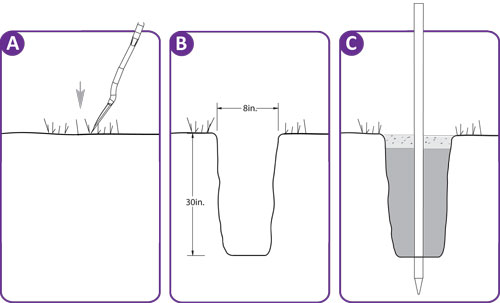
 

A, B. Dig hole 8in. in diameter by 30in. deep.

C. Pour 3 to 5 bags of pre-mixed concrete into the hole and install your anchor.

Option 3: Use Styrofoam filler around your anchor
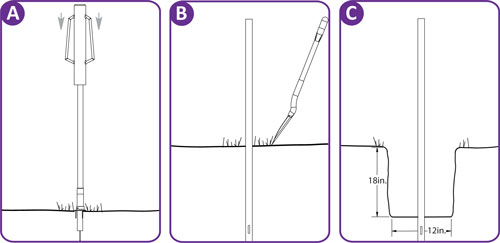
A. WamBam your anchor into the suggested depth, either 36in. or 48in. deep.

B, C. Remove anchor positioner and dig around the anchor a minimum of 18in. deep x 12in. square hole.
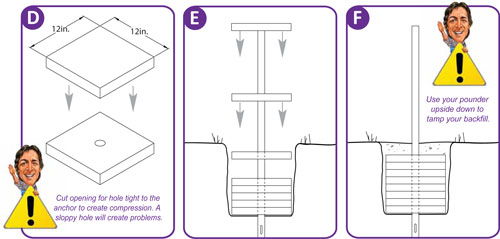
D. Cut 1 or 2in. Styrofoam into 12in. x 12in. square blocks and cut 1-5/8in. hole in the center.

E. Load Styrofoam blocks over the anchor down into the bottom of the hole.

F. Fill in the last 3in. or 4in. with back filled dirt.

Option 4: Compact the Soil Around the Anchor

Ensure the ground around the anchor is moist to accelerate compaction

Add additional soil in a 10″ to 12″ diameter circle as necessary around the anchor.

Flip the post driver upside down to use as a compaction tool. A spud bar flipped upside down also works a great compaction tool.
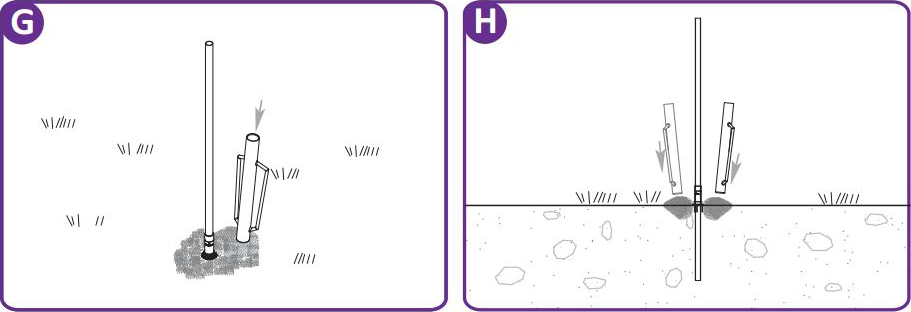
Add additional soil and repeat as necessary. The intent is that the ground around your anchor should become very dense and well compacted.


! Note: 
This can also be done after your fence is installed if necessary. Ideally, however, it should be done at the pipe anchor installation stage.

How do I deal with extremely hard or dry ground?

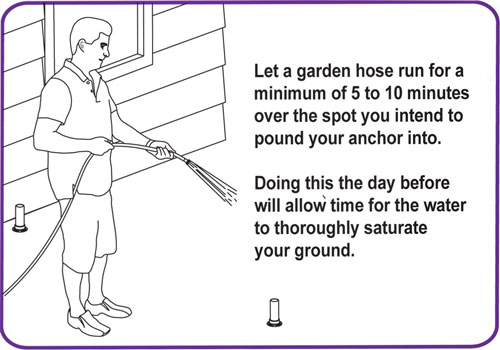
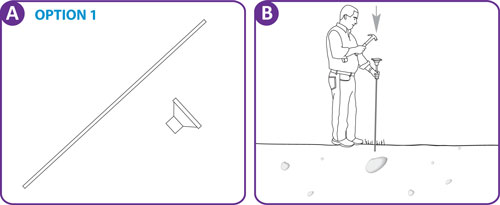
Option 1: Use water to loosen soil

Outlined below are some additional things you can do if you still find pounding your anchor is going too slow.

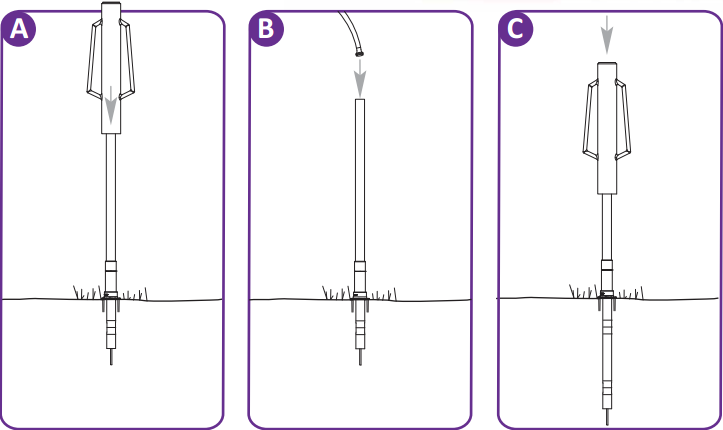
Option 2: Use concentrated water to loosen soil

A. Pound anchor into ground as far as possible.

B. Fill anchor to the top with water and let sit until water is completely drained.

C. Continue to pound anchor into ground and repeat steps at separate intervals as needed.

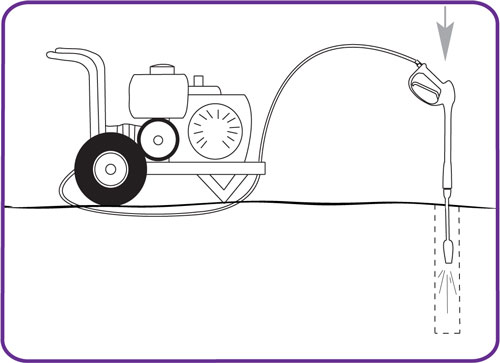
Option 3: Use high pressure water to loosen soil

A powerwasher can optionally work well as a pre-drilling device into the ground in advance of the anchor being pounded in. Prepare to get messy even if you fashion a temporary shield. Do not go any deeper than about 18in. using this technique. The anchor needs to penetrate virgin and undisturbed soil beneath the pre-drilled hole, much like a screw being pre-drilled into hardwood.

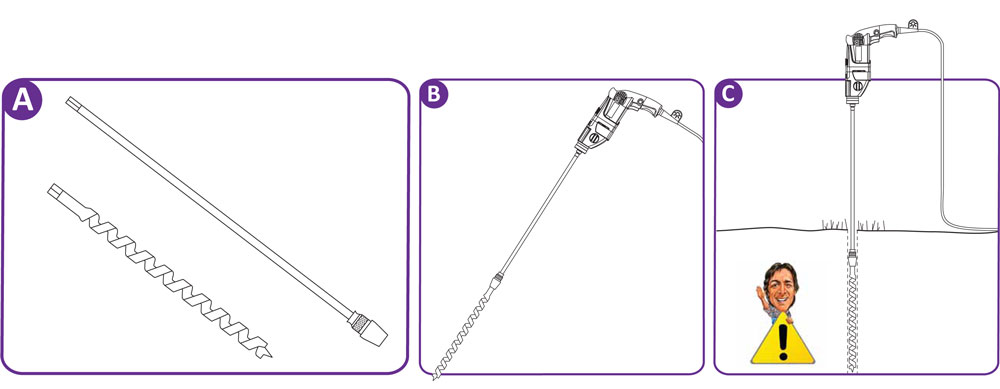
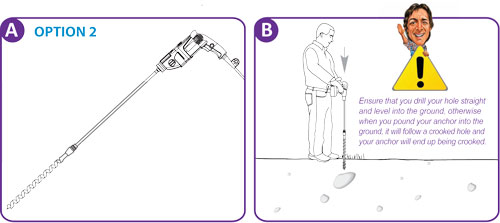
Option 4: Pre-drill a pilot hole into the ground

A. Attempting to pre-drill a pilot hole into the ground before pounding in your anchor may be a possible solution.

B. Use a 1in. or 1-1/2in. diameter x 18in. long auger bit with an 18in. extension (both are available at most hardware stores). Preferably use a pistol style electrical drill (heavy duty cordless may even be acceptable in some conditions).

Ensure that you drill your hole straight and level into the ground, otherwise when you pound your anchor into the ground, it will follow a crooked hole and your anchor will end up being crooked.

How do I deal with rocks and other underground obstructions?

By far the most frustrating part of installing a fence is running into unforeseen obstacles under the ground. It doesn’t matter if you go the WamBam way or the traditional way- a big rock or tree root is going to cause you grief.

Large Rocks?

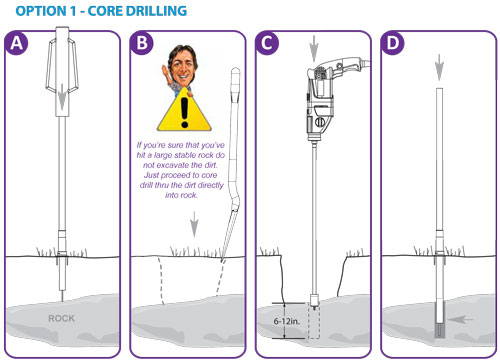
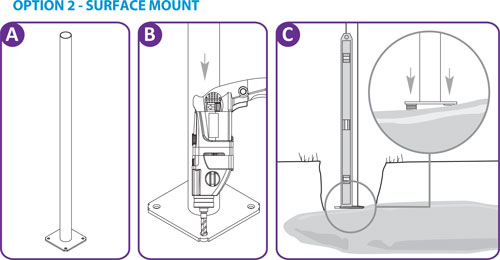
If the rock is large and stable enough it may be the perfect foundation to support your fence. We would recommend a technique called core drilling to mount your anchors (illustrated below) or using our surface mount.

B. Excavate dirt to determine how large of a rock you have hit.

C. Use a core drill (a powerful drill designed to drill holes in solid rock). Create a 1-5/8in. to 1-7/8in. diameter hold, anywhere from 6in. to 12in. deep.

D. Fill hole with liquid concrete, or wedge the anchor directly into the hole if it is tight enough to create solid compression.

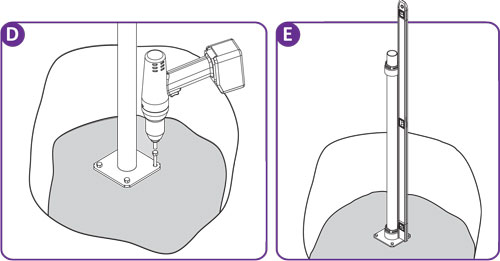
A. B. Purchase our surface mounts for either vinyl fence or ornamental aluminum fence. Using a hammer drill, create the holes necessary for the anchors. You may want to enlarge the holes on the base plate and use expanding bolts to create a stronger connection than the regular fasteners included.

C. Level surface mount with galvanized washers.

E. For vinyl posts, use the leveling donuts to compensate for any crookedness that still exists in the anchor shaft.

Small Rocks?

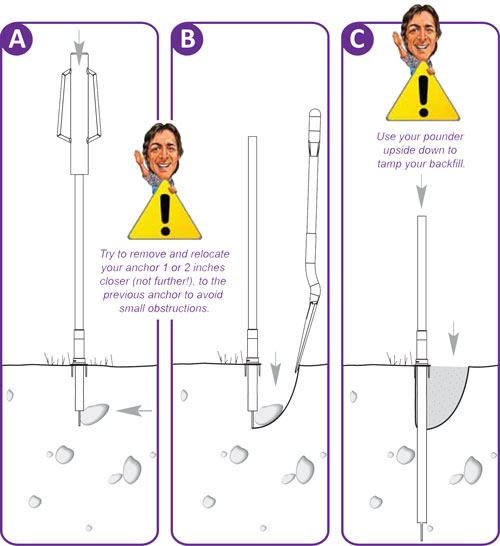
Your anchor will penetrate smaller intermittent stones (less than 1 inch) with relative ease. For larger rocks, dig them out of the way much in the same way if you were installing a traditional fence footing. Depending how far they are under the surface will determine if you can backfill with granular material (gravel that will compact) and re-drive your anchor into the ground.

A & B. You may need to excavate and dig out the small rocks to gain penetration.

C. Backfill with material (dirt or gravel) that will compress tightly around the anchor and provide adequate stabilization.

Tree Roots?

The wedge welded on the bottom of the pipe anchor (vinyl only, aluminum pipe anchors do not have this) is designed to slice through tree roots up to about 2in. in diameter. For larger tree roots either relocate the anchor (if possible) or excavate and cut out the section of the offending root.

How do I determine if obstructions exist underground?

If you’re at all suspicious that you might run into some underground obstructions when installing your pipe anchors, we strongly encourage you to do some underground “investigating” prior to ordering your fence. It’s important to check your ground if you are concerned about rocks. There are some conditions that WamBam Fence won’t work in, such as a yard peppered with medium sized rocks underground.
A. Use a 1/4in. to 1/2in. thick round steel re-bar with a pounding cap or equivalent. These materials can be purchased at your local hardware store. A 36in. to 42in. length can be purchased for less than $10.00.

B. After identifying the future location of your anchors, use the steel bar to probe the ground accordingly.

A. Use a 1in. or 1 1/2in. diameter x 18in. auger bit with an 18in. extension (both available at most hardware stores). Preferably use a pistol style electrical drill (heavy duty cordless may even be acceptable in some conditions).

B. After identifying the future location of your anchors, use the drill to probe the ground accordingly.


 by Denise
Share

How do I deal with sloping ground for my vinyl fence?

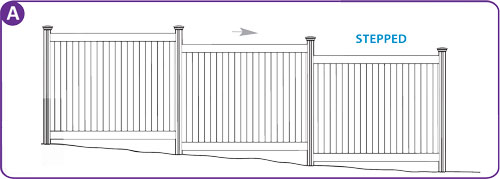
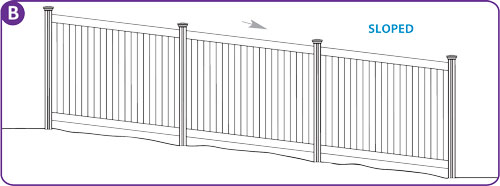
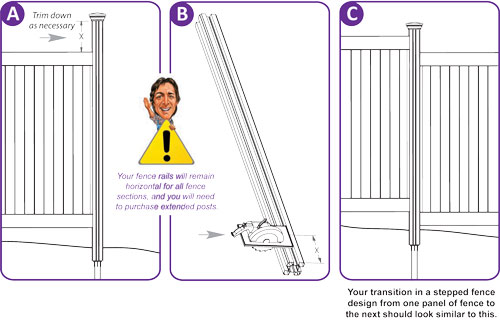
There are two ways to tackle a vinyl fence line with ground that slopes either up or down. You can step or slope your vinyl fence as illustrated below. Because no other man-made vertical element in your backyard is generally installed with a noticeable slope, neither should your fence. However, this is just personal preference. Yours may be different. The exception is the Even Stephen and Simple Simon fence styles. They should be only installed using the slope method going up or down with the changes in your elevation. For all other vinyl fence styles, keeping the top of your fence level generally takes a little more installation time and is a little more costly (you need to order the next longer post size up), but the overall effect is more pleasing to the eye.


Stepped Fence Considerations

You will need to trim down your posts length (because you’ve ordered extra long posts) either as you install your fence (see illustrations below), or leave them all randomly high and trim at completion. See tips on how to cut vinyl here.

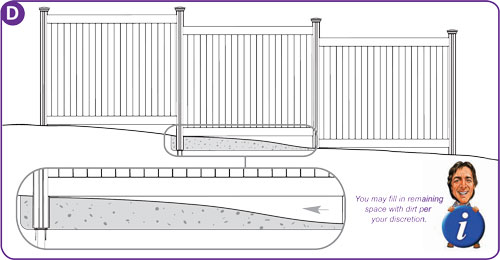
At the higher ground, keep the bottom rail either as close to the ground as possible, or even bury it down a few  inches. This will help keep the gap on the bottom rail at the lower ground as minimal as possible. Once your fence is complete, you can “feather in” backfill dirt to minimize the gap between the bottom rail and the ground.

 Sloped Fence Considerations

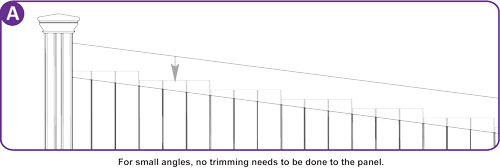
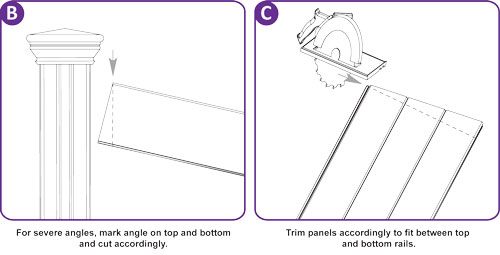
If you choose to go with the slope method, you need to be aware of the following potential conflicts. If your slope is severe (greater than 10 degrees- see how to calculate this here) you will need to angle cut your rails and the top and bottom of your fence boards (on certain styles only) to fit and function properly. Please note that you can only cut so much. There are limitations with steep angles. If you slope is greater than 15 degrees or so, talk to your fence consultant about potential solutions.

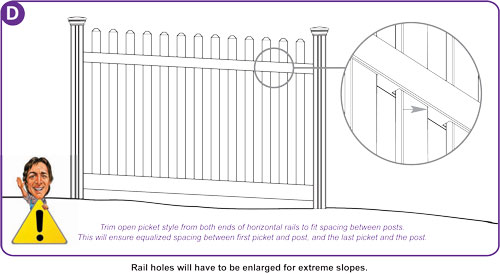
If you use the slope method to install the Jiminy Picket, Nervous Nelly, or the Peeping Tom Fence, you may need to enlarge the holes on the bottom of the top fence rail. This will allow your pickets to remain vertical while your rails are sloped. These holes already come enlarged for moderately sloped fence lines. You can use a rat tail file to accomplish this rather quickly.

(To enlarge holes, you can use a little dremel router.  A fine tooth blade jigsaw would also work, and a file would do the job if you only had 1 or 2 panels.)


 by Denise
Share

How do I determine the slope of my fence line?

Often the ground slope of your fence line will be much greater than you think it is. To understand how much of a fall your fence line has, run a level string line from the start to the finish of your fence line. You will need to compensate for this difference in height either equally throughout your fence panels or whatever is most visually pleasing to you.

To determine rise height:
height/length=slope

To determine your slope degree:
1. Determine the percentage of slope:
Slope (%) = height/length x 100

2. Use the table below to convert the slope in percentage to degrees.
Slope (%) Slope
(degrees)
1.8
3.5
5.2
7.0
8.8
10.5
12.3
14.0
15.8
17.6 10°
19.4 11°
21.2 12°
23.1 13°
24.0 14°
26.8 15°
28.7 16°
30.6 17°
32.5 18°
34.4 19°
36.4 20°
38.4 21°

Example:

A customer has an 11in. increase over a 120in. length fence run.
Slope (%) = 11/120 x 100
Slope (%)= 9.2

According to the chart, the degree is approximately 5.5°, as it falls in between where 5° and 6° on the chart.

(If you want to figure this out with mathematical precision, apply an arctangent function to this value to obtain the angle of the slope. In other words, on a scientific calculator, hit the ‘inv’ button and then the ‘tan’ button to get the slope angle).

*If your slope is greater than 10 degrees, please order large anchors regardless of your fence style for vinyl fence.

Please see these articles for more detail:


Categories