 by Denise
A. You will need to purchase a special bracket designed to angle your aluminum fence rails. Please call us at 1-877-778-5733 and we can help you out.

A. You will need to purchase a special bracket designed to angle your aluminum fence rails. Please call us at 1-877-778-5733 and we can help you out.

A. Measure distance between posts, subtracting 1/4in. from total length for backet compensation.
B. Measure both top and bottom rails to ensure both are the same length before cutting.

D. The rail brackets are designed to allow for up to 1in. of extension beyond end of rails on each side for a total of 2in.

E. Screw self tapping screw in both sides of bracket into the rail.
Use a ‘Bit & Screw Holder’ when using 3-1/2 inch screws. This handy little device comes in most drill sets, and really helps to set up and screw the 3-1/2 inch screws into place. It totally prevents you from dropping the screw and having to hold on to it at point of entry. If you have one, we highly recommend using it, and if you don’t, you might want to consider purchasing one.

Vinyl fencing can be cut just like wood. Preferably use a circular saw with a PVC blade or a sharp and straight fine-tooth carbide blade. If your saw blade is designed for rough cutting lumber and dull, it could shatter the vinyl. This is especially true if the vinyl is cold.
1. You can either leave the leveling donut off or on during pounding.
In the vast majority of installations, the top of your anchor will not mushroom enough to cause conflict when putting the donut back over the anchor. The only potential problem is really hard or dry ground where repeated blows with the pounder are required.

2. Begin to use your level only after your anchor has been pounded about 18 inches into the ground.
Initially you can use other level reference points (house, another fence etc.) to eyeball level from. Step back 3 or 4 feet from your anchor in both directions to do this.

3. Use the handles of your pounder to either push or pull your anchor into alignment.

4. Slightly over compensate when pushing or pulling your anchor back into alignment.
Your anchor will have a tendency to want to revert or spring back to where it was being adjusted from, especially as it penetrates deeper into the ground. Pounding from the same side you want the anchor to travel towards is also recommended.

5. Try not to adjust your anchor into alignment for the last 6-12in. of penetration.
Adjustment at this stage requires the entire anchor shaft to be overly corrected which can enlarge the side of the hole you have just created during penetration. You want the ground to be as tight as possible around your anchor. Remember your anchor can be corrected to level using your leveling donut.

6. Speed things up by using two people on the pounder.
Two people working together in rhythm can really speed things up and lighten the overall burden. Grab a buddy and get into it.
1. You’re gonna sweat!
Getting something that’s about 20 or even 30lbs to move up and down repeatedly takes a lot of work. You can see this by watching the “Manual Post Drivers in Action Video” on our website. Even on a cool day you are going to sweat. Remember you will be sweating about half as much (or less) compared to using a gas powered auger, mixing concrete and getting rid all of your excavated soil. If you want to sweat a little less, you can use a pneumatic pounder. Call us at 1-877-778-5733 for information on renting one from us.
2. Relax your grip on the pounder!
Relax your grip on the down-stroke to minimize vibration fatigue. If it’s possible hang on to the shaft of the pounder versus hanging onto to the handles. The handles will tend to give off more vibration and shock. You’ll be a little less sore in the morning as well. Clever Joe suggests that “throwing” the pounder down can avoid this completely. In other words, release your hands completely before anchor and pounder impact each other.
3. Take a break!
Breaking down the most demanding physical part of your project into smaller chunks will make it easier. Slow down and enjoy yourself. You’re still going to finish faster than if you had to auger, mix concrete and clean up.
4. Your anchor can get out of level very quickly.
After your anchor is about 18in. into the ground, begin to check for level at about 6in. intervals during penetration into the ground. This will slow you down significantly but ultimately will save you time by avoiding a severely crooked anchor.

5. Get down on your knees!
Use cardboard box as a mat for your knees when you get down so far into the ground. This position for obvious reasons is the way to go at lower heights.

6. Watch your head!
I’ve had the post pounder hit me in the head once or twice when getting a little too rigorous on the upstroke. When the pounder comes up just above the anchor, on the down-stroke (especially if you’re tired), you can get a little off center. Because you are powering it back down, you might hit the top of the anchor. When this happens, it can cause the post pounder to come down unto your noggin. This is primarily an issue when the pounder is being used at head level or above. If you have a hard helmet, why not wear it? Don’t be afraid to look like a slightly anal safety inspector. Those guys and gals have jobs for a reason.

7. Use Gloves
If your hands are not conditioned to manual work, you may want to wear gloves when pounding to avoid blisters. This is especially true on very warm days as the skin on your hands begins to sweat.
For angles greater or less than 90 degrees, we highly recommend you purchase our vinyl angle helper kits. These kits are designed to fit into the channels of our posts and convert the grooved post into a flat surface. Once the Angle Helper Kit is installed, the end of the rail can then be cut at the angle you need for your project and attached to the new flat side of the post.
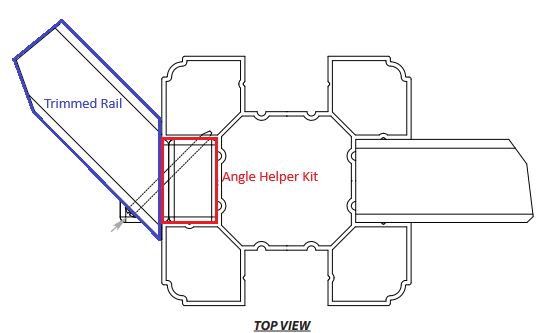
You can install the fence at an angle without the kits and the following will show you how. However, be forewarned that cutting the vinyl in this way isn’t easy.

A. Mark angle and post channel corner to cut on top and bottom rail according to your fence angle.
B. Cut on marked lines previously made on both top and bottom rails.
C. Insert wood into the end of the rail. This will create a strong connection between the rail and the post because your screw will have more to bite into other than one vertical wall surface on your rail.
During your vinyl fence install, you may find that you are unable to sleeve your vinyl post over your anchor due to a low hanging roof line. You can work around this scenario in one of three ways.

Option One
If possible, continue to pound the anchor lower into the ground just enough to accommodate the installation of the vinyl post over the top of the anchor and leveling donut.

Option Two
A, B. Cut open your vinyl post so it can wrap itself around your leveling donut and anchor positioner.


C. Secure in place as necessary

Option Three

A. Cut down a piece of wood to fit inside of your post.
B. Cut a second piece of wood to fit between post and wall. Leave enough space for post cap to fit.
C. Screw outer piece of wood to wall first.
 D. Secure into place as necessary.
A. If your anchors inadvertently were spaced too far apart, you can extend your horizontal rails using wood blocking cut to fill the void in the extruded cavity.

B-D. Sleeve over your wood blocking by using the same size extruded vinyl. If you do not have any left over waste, please call us at 1.877.778.5733 as we may be able to help you with finding a solution.

This article addresses how to trim down your vinyl fence panels. We recommend prior to doing this that you first read this article on equalizing your fence sections.

A. Measure distance between vinyl posts and cut to the measured length.

B. Measure both top and bottom rail to ensure both are the same length before cutting.

C. Trim last vinyl fence panel as needed to fit within the posts and rails.
